
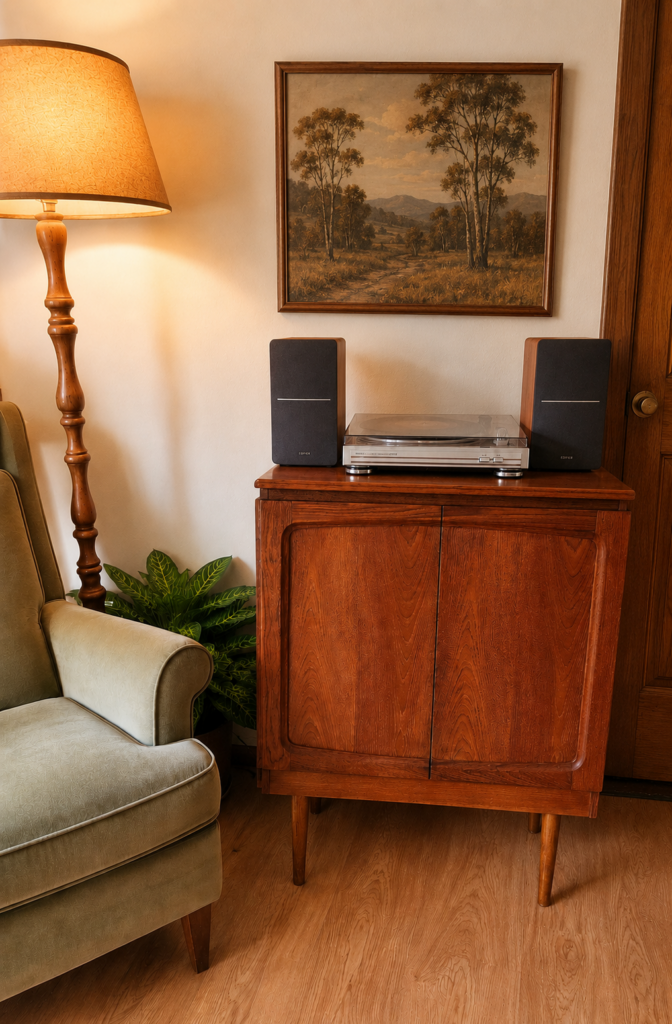
See how I transformed a chemical- and water-damaged Chiswell cabinet that someone was giving away for free into a beautiful mid-century statement piece for less than $50 using simple DIY restoration techniques.
Introduction
One person’s rubbish really can become another person’s treasure.
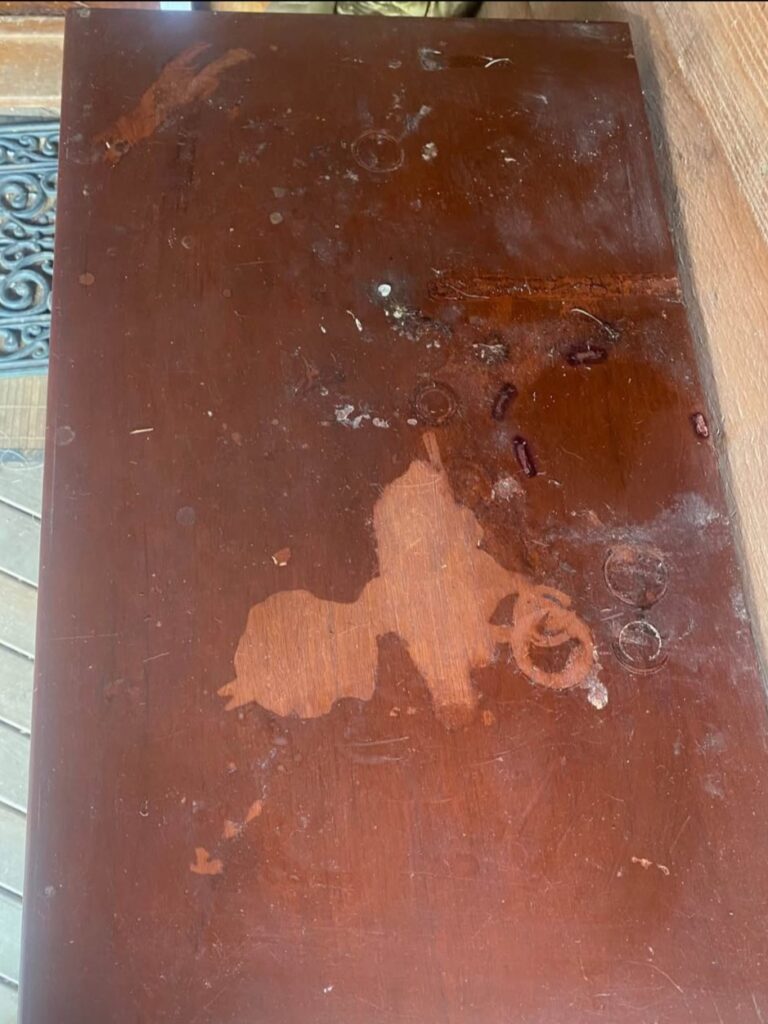
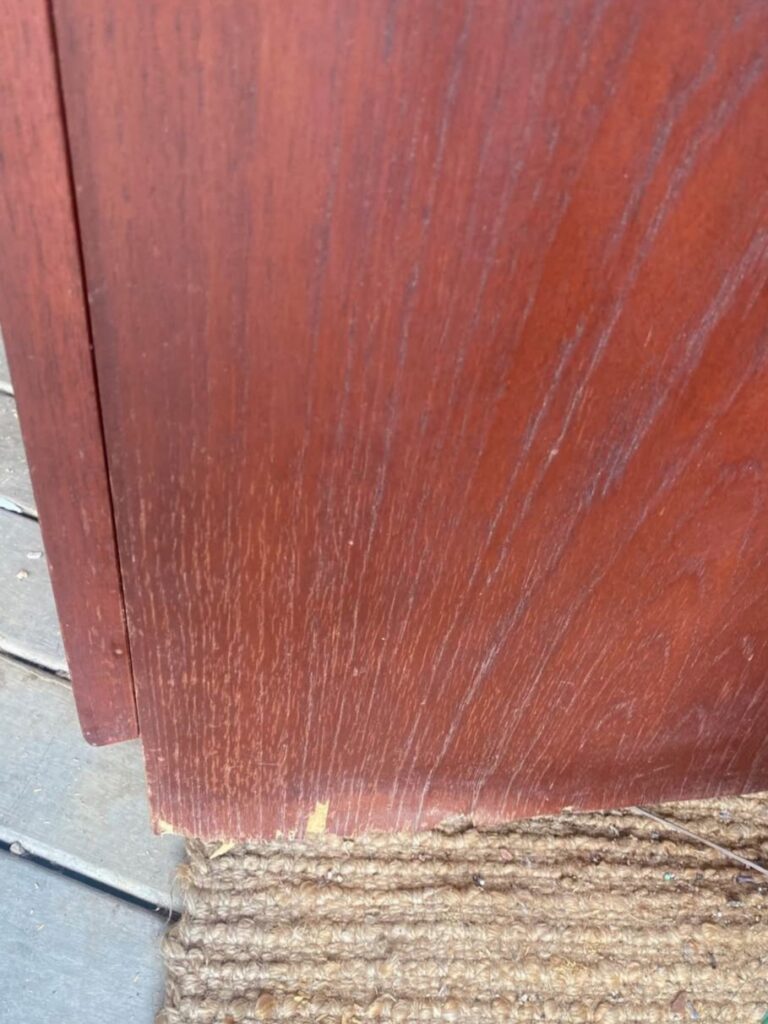
When I came across this old Chiswell cabinet, it was far from showroom condition. The veneer at the bottom was lifting, the chipboard underneath had swollen from water damage, the finish on the top was damaged from leaky bottles of chemicals, and it had definitely seen better days.
For those unfamiliar with the name, Chiswell was one of the premier Australian manufacturers of the mid-century era, creating premium teak furniture that is highly sought-after by vintage collectors today. In restored condition, it is valuable. In this state, it was worthless.
Most people would have walked straight past it or taken it to the tip. Instead, I saw something different, despite very little experience in DIY restoration.
Underneath the years of neglect was a beautifully made cabinet with solid construction and plenty of potential. Best of all, it didn’t cost me a cent.
I personally love the timeless elegance of vintage Chiswell furniture. This blends mid-century craftsmanship with the iconic wave handles and sleek lines that make Australian retro design so special.
Here’s how I transformed this forgotten piece into a modern statement cabinet for less than $50.
Finding the Cabinet
This project started with a bit of luck.
The Chiswell cabinet was being given away for free on Facebook Marketplace in my local area. The previous owner no longer wanted it, and thanks to the damage, it wasn’t attracting much interest.
While many people are put off by damaged veneer, I always try to look beyond the surface.
Good furniture is becoming harder to find, and older Australian-made pieces like this were built to last.
The cabinet had great proportions, clean lines and quality construction—all things that can’t be fixed with modern flat-pack furniture.
It simply needed someone willing to give it a second chance.
Assessing the Damage
The biggest issue was the water damage.
Moisture had caused sections of the chipboard beneath the veneer along the bottom edges of both sides to swell, pushing the veneer upwards and leaving the surface uneven.
Rather than trying to glue the damaged veneer back down, I decided to remove the affected sections completely so that I could scrape off the swollen chipboard underneath with a sharp blade.
I kept the bigger pieces of veneer to one side to re-attach once everything was level. What I couldn’t re-attach, I planned to colour match later.
My goal was to repair the damage properly and keep the original structure of the cabinet intact.
Removing the Damaged Veneer
I carefully removed all of the loose veneer and cut away the swollen chipboard underneath.
This left a clean surface to work with and eliminated the damaged material that would have continued causing problems later. I then use simple wood glue as a sealer on the raw chipboard to stop any further flaking.
Once that was dry, I re-attached the veneer chips with wood glue and added a teak-coloured wood filler to level everything, fill in any remaining gaps and leave a smooth surface for colour matching.
Taking the extra time at this stage makes all the difference.
Good preparation is often the key to a professional-looking finish.
Sanding Everything Back
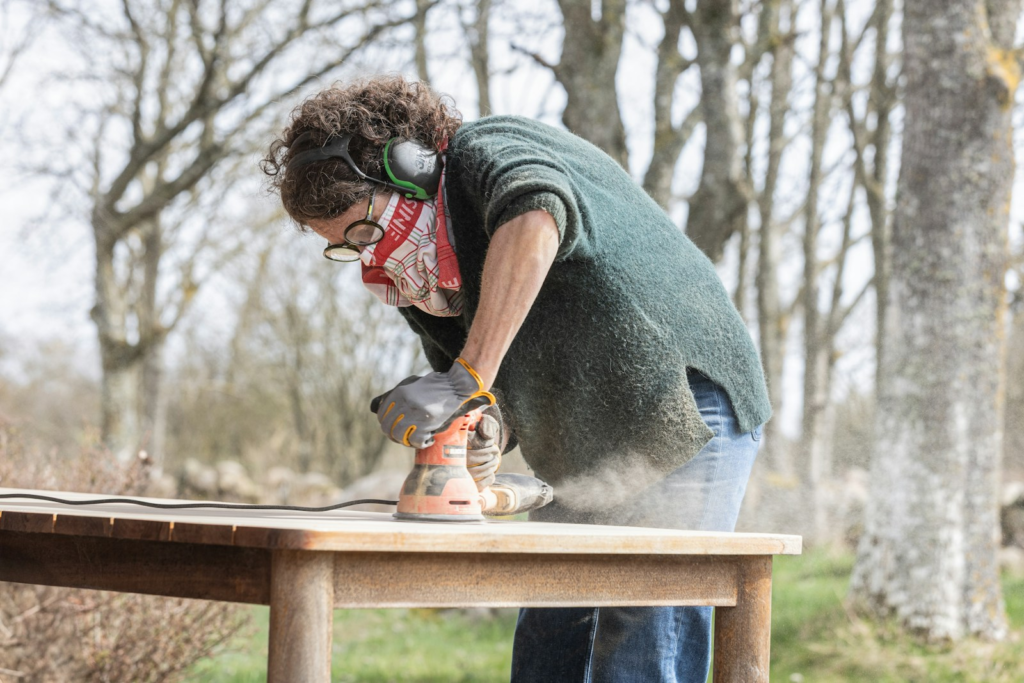
With the damaged areas removed and the wood filler applied, it was time to sand the cabinet.
I worked carefully, sanding the old red finish off of every surface, while preserving the original veneer and making sure the filled edges were smooth. The top came up great – all of the ring marks were in the finish and not the actual wood, which is what attracted me to this piece in the first place.
Sanding is one of those jobs that rewards patience.
I always start with a 120-grit sanding disc on my orbital sander and often move down to 80 grit if the finish is particularly hard to remove, even on veneer (although many people prefer to stick to 120 grit to be on the safe side). Regardless, I always use caution around the edges, where the risk of burning through the veneer is very real and switch to hand sanding around those areas if I’m unsure.
Rushing this stage almost always shows in the finished result.
Bringing the Timber Back to Life
Once the initial repairs were complete, I applied three coats of Danish Oil to the cabinet with a cloth, leaving each coat to dry for 24 hours.
This is one of my favourite finishes because it enhances the natural timber rather than covering it.
Immediately, the grain came alive.
The timber developed warmth, depth and character that had been hidden beneath years of wear.
It’s one of those moments that reminds you why furniture restoration is so rewarding.
Colour Matching the Repair
One of the challenges when repairing veneer is making the repaired area blend naturally with the surrounding timber.
It’s important not to colour match to the colour of the raw wood so the colour matching was only done after the oil finish had properly dried, according to the manufacturer’s instructions.
Rather than replacing the veneer, I colour matched the repaired sections using a cheap set of artist’s oil paints and some cheap paint brushes from Kmart.
Hot tip: You can use AI (I used ChatGPT) to give you an idea of what colours to mix to colour match to your timber tone if you upload a picture of the wood in good light (daylight, not artificial light).
From memory, I mainly used titanium white, raw umber, burnt sienna and yellow ochre.
Building the colour gradually allowed me to recreate the natural variation found in timber grain. I then used brown and black coloured pencils I had lying around to add in the details of the grain once the paint was dry.
Colour matching takes a lot of patience, but it’s incredibly satisfying when the repairs almost disappear into the surrounding wood.

Giving It a New Look
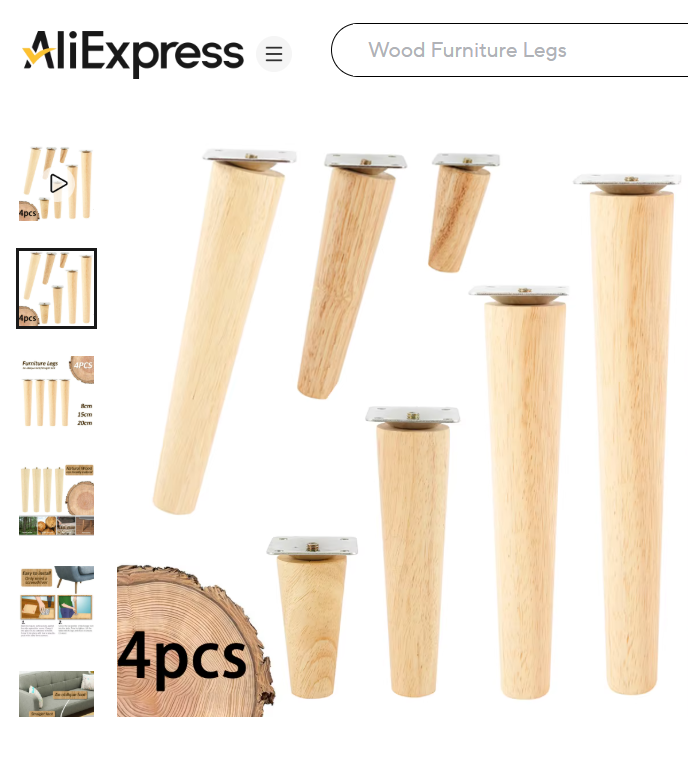
The original cabinet sat flat on the ground, so I decided to give it a more contemporary look by adding timber legs.
Raising the cabinet completely changed its appearance.
It now feels lighter, more modern and much more suited to today’s interiors.
Sometimes a small change like adding legs can completely transform an older piece of furniture.
I used tapered timber legs from AliExpress (see How to Find the Best Bargains on AliExpress for more information on this).
Colour Matching the New Timber Legs
The timber legs arrived with a thin lacquer finish in a pale beech-like colour, so I quickly hand sanded the finish off to help the stain absorb.
To make sure that the new legs looked like they had always belonged on the cabinet, I stained them using a custom mix of Feast Watson Teak Stain (in Teak Brown) combined with Dewaxed Blonde Shellac Flakes (from Restorer’s Choice, not sponsored) dissolved in methylated spirits (alternatively, you could use pre-made French Polish).
I added the quantity of Prooftint by eye, testing the colour on some scrap wood, until it seemed about right. Then, I applied three coats to the timber legs until I reached the right depth of colour to match the cabinet.
This allowed me to closely match the rich colour of the restored cabinet while still allowing the natural grain of the timber to show through.
The result feels cohesive rather than looking like an obvious addition.
Protecting the Finish
The final step was applying Fiddes Hard Wax Oil in Silk using a small microfibre roller dipped straight from the tin to apply it.
Because oil paints are notoriously slow drying, it is recommended to wait at least two weeks before applying the final finish in order to let the oil paint harden through a slow chemical reaction with the air. I waited eight weeks just to be on the safe side and because the weather had been quite wet. This was in order to minimise the amount of moisture in the air and make sure the oil paint was fully cured.
The addition of the hard wax oil provides a durable finish while maintaining the natural appearance and feel of the timber.
Unlike thick polyurethane coatings, hard wax oils soak into the timber and leave a beautiful low-sheen finish that is easy to maintain and repair if required. You can just add another coat without sanding it back.
For vintage furniture as beautiful as this piece, it’s a finish that’s difficult to beat.
The Cost Breakdown
One of the best parts of this project was the cost (reported in AUD).
- Chiswell cabinet: Free
- Sanding discs: I used 2 x 120 grit and 2 x 240 grit sanding discs ($21.49 for a 50 pack of each grit from Aliexpress) at a cost of $0.86
- Danish Oil: I used about 200mL Organoil Danish oil ($34.60/500mL), which equates to 13.84
- Gorilla wood glue: I already had this and only used a tiny amount ($15.62/236mL), which equates to about $0.40
- Timbermate wood filler: I used a small amount of this ($10.29/250g), which equates to $2.06
- Feast Watson Teak Stain: I used about a third of a bottle ($13.80/50mL), which equates to $4.60
- Shellac flakes: I mixed about 24g (2lb cut) and had some left over ($18.90/100g), which equates to $4.54
- Methylated spirits: I used 100mL to dissolve the shellac flakes in an old bottle ($5.85/L), which equates to $0.59
- Fiddes Hard Wax Oil: I used about one quarter of a tin ($42.00/L), which equates to $10.50
- Timber tapered legs – 25cm: Purchased from Aliexpress for $12.14 on sale.
Total project cost: $49.53
For less than the price of a budget flat-pack cabinet, I ended up with a unique piece of furniture that will likely last for decades.
The Finished Result
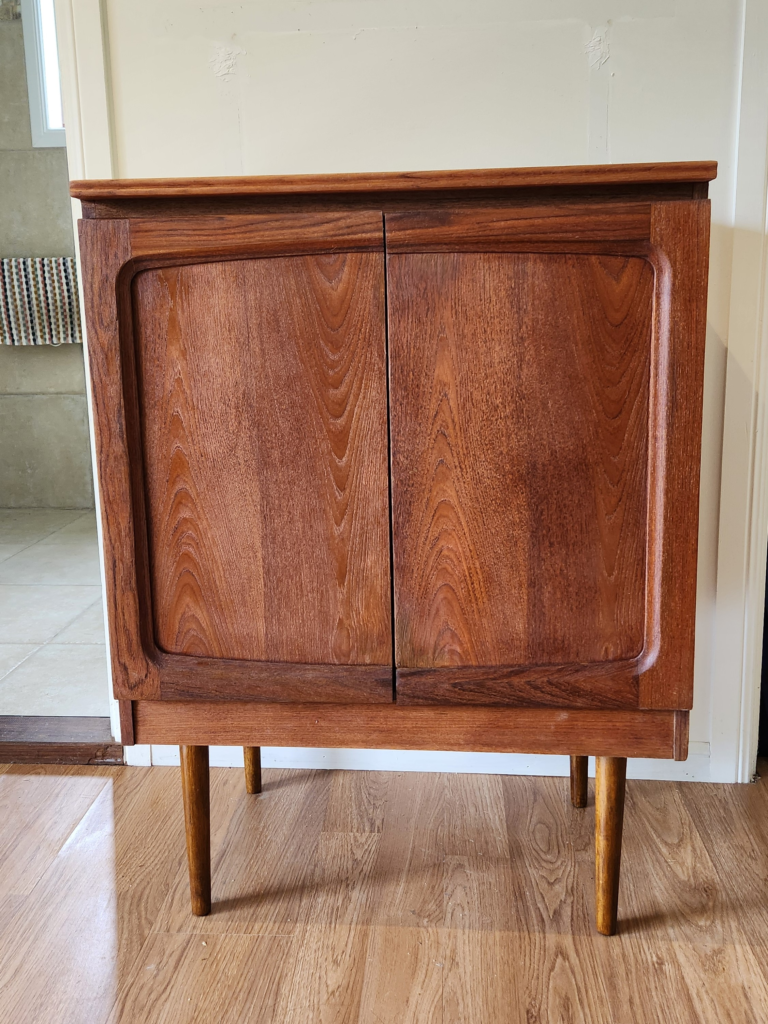
Looking at the finished cabinet today, it’s hard to believe where it started.
What was once considered rubbish has become one of my favourite pieces of furniture.
The clean lines, warm timber tones and elevated stance give it a timeless mid-century feel while still respecting its original character.
More importantly, another quality piece of Australian-made furniture has been saved from landfill.
What This Project Taught Me
Every furniture restoration teaches you something new.
This project reinforced a lesson I’ve learned many times:
Don’t judge furniture by its finish.
Evaluate the structure.
Look at the craftsmanship.
Imagine the potential.
Water damage can often be repaired.
Old finishes can be removed.
But solid construction is something you simply can’t add later.
That gorgeous teak veneer has really come alive.
Final Thoughts
One of the things I love most about furniture restoration is that every piece has a story.
This cabinet was destined for landfill because of cosmetic damage that many people considered beyond repair.
With some patience, a handful of restoration products and less than $50, it has become a beautiful feature piece that will hopefully be enjoyed for many more years.
Projects like this reiterate that creating a beautiful home doesn’t always mean buying something new.
Sometimes the best furniture is already out there—it’s simply waiting for someone to see its potential.
If you’re thinking about trying furniture restoration yourself, don’t wait for the perfect project.
Start with the next forgotten piece you come across.
You might just discover your own hidden treasure.
Frequently Asked Questions
Why did you remove the damaged veneer instead of replacing it?
The water damage had caused the chipboard underneath to swell, so removing the damaged material created a stable surface for the repair.
I managed to reattach a couple of larger pieces that I removed but adding all the little pieces back in would have created too many obvious join lines.
Trying to match the grain with a completely new piece of veneer would have been tricky, so I decided to get creative with some paints and coloured pencils instead.
Why did you use Danish Oil?
Danish Oil enhances the natural grain of the timber while providing protection and a warm, low-sheen finish that suits vintage furniture.
Why add legs to the cabinet?
Adding legs gave the cabinet a lighter, more period-appropriate appearance and now I can run the vacuum cleaner underneath it!
What topcoat did you use?
I finished the cabinet with Fiddes Hard Wax Oil (Silk).
This provides excellent durability while preserving the natural look and feel of the timber. It’s also a more low-tox option.
Can water-damaged furniture always be restored?
Not always, but many pieces that appear beyond saving can be successfully repaired if the structural damage isn’t too severe. The key is to assess the construction before deciding whether a restoration is worthwhile.
Leave a Reply